Grant's 2021 Garden Railroad Rebuild
Part One
Grant has sent along some more images and narrative detailing the further developments on his garden railroad.
The following descriptions and captions along with the images come directly from Grant. Thanks, Grant, for sharing these with us!
Remember, you can enlarge the images by clicking on them and shrink them by clicking outside them.
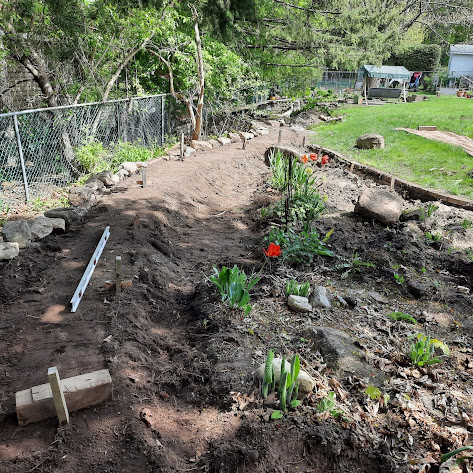
This image was shared in an earlier post. Let's now check in on what Grant has accomplished in the interim.
With the repairs to the existing trackage in the Southern
Loop completed, we are able to turn our focus onto the new Northern Loop. The location of the new septic bed (installed
last year) conflicted with the original Northern Loop thus we were required to
rethink this part of the layout. Since the railroad runs through the various
gardens on the property, detailed discussions/negotiations were required with
the resident Gardener (my wife) to determine the best location for the ROW
while honouring the vision for the garden, ultimately, they have to exist in a
harmonious manner together yet complement each other. Lucky for me, the new design significantly
increased the mainline length!
My preference was to build the Northern Loop at the same
elevation as the Southern Loop but with the new septic bed in place, the
Northern Loop would have to be at a higher level to clear the bed thus the main
line between the loops was rebuilt with a 2% grade to gain the necessary
height. Once at this height, the whole Northern Loop would be level.
Last fall with the assistance of David Steer, we staked out
the new ROW marking out the horizontal and vertical placement. Like the
Southern Loop, the property slopes downward here so there will be some
significant landscaping required to fill in the low areas and to cut into the
higher areas. To further complicate the picture, there is an existing garden in
this space where certain plants had to be retained.
The Northern Loop contains a passing siding (at the
station), a stub siding and a turnout to a future mining branch.
Follow along through the pictures as we build this new
section to the railroad.

The Northern Loop is located in the back left corner of the property surrounded by a picket fence on two sides and the lawn on the third side. The property slopes towards the back of the lot. The track from the Southern Loop enters in from the top right of the plan. The future mining branch will head to the right.
Construction commenced with the careful removal of cherished plants while others had to remain in place during construction for it was not safe to transplant them at this time. Much of the construction activities, and design refinements were required to be reviewed and approved by the Gardener in advance.
The grey curbing denotes the front edge of the garden/railroad. The new septic bed extends under part of the garden here.
The next task was to build the rock retaining wall to support the new road bed as it traverses the rear portion of this area. Though many rocks were uncovered during the septic installation, more were required to which my neighbour enthusiastically donated 40 from his rock pile, of course I had to fetch them! In all I figure the wall consumed about 100 rocks ranging from 10 to 80 pounds.
Once the rock wall was built, the dirt was leveled out and the track bed was constructed. The survey stakes from last fall were still in place and these guided our road building activities. Our starting point was the end of the trestle on the track from the Southern Loop. This became our datum point (starting elevation) for the Northern Loop. The roadbed was built 3.5” lower than the target rail height to allow for the wooden sub road bed and the gravel ballast.
Using a four foot level and following our survey stakes I slowly worked my way along the ROW packing dirt in the low spots and shaving down the highs.
Unlike building indoor layouts, Garden Railroads require a different, larger, set of tools for construction, in this case the tools of choice are a shovel and hoe.
Here is "yours truly" carving out the ROW as it loops around to the front of the garden. What you don’t see is the bush that used to be on the right which required extensive back breaking work to remove it and associated roots. Originally the plan was to go around it but when we got to this point, the Horticulturist decided that since it never grew well in this location it could be removed. Ultimately this decision made my life easier as well as making for a better garden.
After 3 weeks of moving rocks, digging dirt and transplanting plants we finally have the full roadbed roughed in around the full loop. It’s starting to look like something!
From designing many layouts over the years I’ve come to realise that you can (and should) design your track plan on paper with as much detail as possible but when you are finally in the physical space you will need to revisit these plans and be prepared to make adjustments for things will appear different when you see them in the flesh. Here we are positioning some turnouts to determine what fits and what makes sense from an operational perspective. We carefully reviewed three scenarios before settling on the final configuration.
We changed gears at this point (for no good reason) and decided to build the sub roadbed for the return curve. It was a lot easier to build this on the flat open lawn than in the garden bed.
Here David Steer assists with screwing the PT boards together. We are using LGB large radius curve track for this part of the railroad.
Speaking about a change of plans! I had laid out the road bed based on a 6 ft radius curve but since then we were able to snag the LGB curve track which had a wider radius – about 7.5 ft. Thus we had to move the retaining wall in this section out a couple of feet and realign the road bed before the sub roadbed could be positioned.
Here is the curve in place with the track installed. Notice the turnout is in place for the station’s passing track.
With the return curve in place and the orientation of the leading turnouts sorted out, we could start laying out the passing tracks and siding. Here we used long straight 1x2 sticks to eye ball the trackage. We used 12 inch landscape spikes to mark the centre lines.
Once we had the centre lines sorted out we cut and spliced the sub roadbed wood pieces together. Here we have used the landscape spikes on each side to the boards to ensure we return the boards to the correct position as we fit the pieces together.
Here you can see the sub road bed under the turnout ladder coming together. The mainline splits at the first turnout with one branch heading to the right between the two rocks. The other branch goes straight towards the passing siding. Building outdoors involves a lot of physical labour for those two rocks were relocated countless times until we settled on their final resting place.
In this posting we shared 16 if the 32 images Grant sent my way. Later, by tomorrow evening, you will be able to view the second installment of this posting, Part Two.
Thank you, Grant, for these amazing pics and story line!
All the best, Mike Hamer, Ottawa, Ontario, Canada


